
How to get there
- Choose the Staff tool
 . The Staff tool menu appears.
 - Choose Staff > Staff Attributes or Define Staff Styles.
- Click Settings beside Alternate Notation.
What it does
This command lets you fill the selected staff with one of several alternative-notation styles, such as slashes, measure repeats, or blank measures. You can also apply alternate notation to portions of staves using staff styles. (Alternate Notation applied as a Staff Attribute will affect the entire staff. Alternate Notation applied as a Staff Style will affect only the selected region.)
Tip: To apply alternate notation to selected measures, use staff styles. For more information, see Staff Styles.
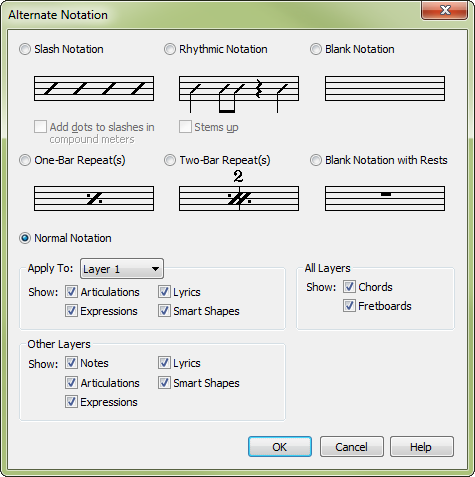
- Slash Notation. Select this alternate-notation style to fill every measure with one slash per beat. In cut time, for example, there would be two slashes per bar. If you want a dot after the slash in compound meters, such as 6/8, check the Add Dots To Slashes In Compound Meters check box. Slash notation is useful for indicating that the player is to "comp," or improvise, a part with an unspecified rhythm.
- Rhythmic Notation. This alternate-notation style converts every note or chord to a stemmed slash. All slashes are centered on the middle staff line, and all stems go down, unless you check the Stems Up in Rhythmic Notation check box. Use this form of slash notation when the player is to "comp" or improvise in a specific rhythm. See Document Options - Alternate Notation for changing rhythmic notation character positioning settings.
- One-Bar Repeat(s). This alternate-notation style hides whatever music is already in the measures, and displays instead the one-bar repeat symbol, indicating that the player is to repeat the contents of the previous measure. See Staff Styles to apply to only selected measures.
- Two-Bar Repeat(s). If you click this option, whatever music is already in a pair of measures gets hidden. Instead, they’re filled with the two-bar repeat symbol, indicating that the player is to repeat the contents of the previous two measures. See Document Options - Alternate Notation for changing the vertical positioning of the number. See Staff Styles to apply to only selected measures.
- Blank Notation. Choose this option to hide all the music in the selected staves. The advantage to this option is that anything attached to the notes in the selected layer—such as lyrics—remain in view. This feature opens up many notational possibilities, such as lyrics beneath blank measures.
- Blank Notation with Rests. Choose this option to hide all the music in the selected staves and display rests instead. This option is useful when using multiple voices in a linked part that display, for example, a single note to specify a tutti (both or all players) section in some measures and a solo in others. Use this alternate notation style in a Staff Style to temporarily change extra notes to rests for printing.
- Normal Notation. Choose this option to display the selected staff in standard music notation.
- Apply to Layer • Show: [Articulations • Lyrics • Expressions • Smart Shapes]. Use this command to choose which layer you would like the alternate notation applied. Select the check boxes below to display those items attached to notes in the layer selected.
- All Layers • Show: [Chords • Fretboards]. Chords and fretboards are attached to the beat, and not a specific layer. Select these check boxes to display chords and/or fretboards.
- Other Layers • Show: [Notes • Lyrics • Articulations • Smart Shapes • Expressions]. This is similar to the check boxes in the section above, but they apply to the other layers, not the layer with the alternate notation.
- Add Dots To Slashes In Compound Meters. Select Slash Notation and check this box to have a dot after the slash in compound meters, such as 6/8.
- Stems Up In Rhythmic Notation. Select Rhythmic Notation and check this box to have rhythmic notation with all stems frozen up instead of stems down.
- OK • Cancel. Click OK to confirm, or Cancel to discard, the settings you’ve made in this dialog box.
See also:

