Finale includes two methods for fine-tuning the balance between instruments during playback — the Mixer and Studio View (which is like a combination of the Mixer and Scroll View).
The Mixer
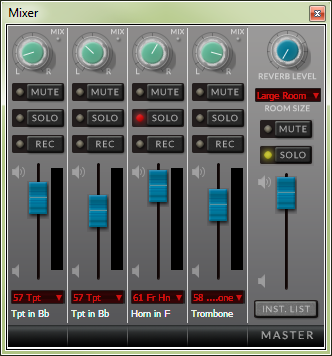
Finale’s Mixer is laid out just like a real mixing board, with volume sliders, pan knobs, and mute and solo buttons for each instrument, as well as a master volume control.

You can use the Mixer during playback to adjust the balance between instruments, set the panning (stereo placement), mute and/or solo tracks, and adjust the overall (master) playback volume. For additional details, see Mixer.
Tip: Despite appearances, the Reverb Level and Room Size settings in the Mixer have no effect when using
Volume
For optimum Garritan instrument playback, you should avoid setting the Mixer's master volume too high. An excessive default level will result in distorted playback when using Garritan instruments. If you need to increase the playback volume, you should first increase your system volume and/or the volume on your computer speakers.
You can use the volume sliders in the Mixer to fine-tune the balance between instruments during playback. If instruments are out of balance, it is usually best to reduce the volume for the instruments that are too loud, rather than increasing the volume for those that are too soft.
It is also important to understand the difference between a Garritan instrument's dynamic/timbre control - which is controlled by the modulation wheel (MIDI controller #1) - and its volume control - which is controlled by the Mixer/Studio View (MIDI controller #7). Unlike modulation wheel changes, adjusting a staff’s volume slider does not affect timbre. It’s exactly like the mixer in a recording studio — instruments playing very quietly can be brought up in the mix, and vice versa.
Also, just like an old-fashioned manual mixing board, the volume sliders in Finale's Mixer aren't automated. Finale's Mixer works best as a "set it and forget it" board, where you choose values that will work well for your entire score. If you need to bring up the viola for just a few measures, you will have to drag the slider up yourself during playback, in real time. However, there are a couple of workarounds if you prefer not to “ride the mixer” during playback:
- You can add a (hidden, if desired) dynamic (or “Solo”) expression to the staff. This is like “fixing it in the room” during a recording session, by telling a musician to play louder in a certain passage. Of course, this will affect both volume and timbre.
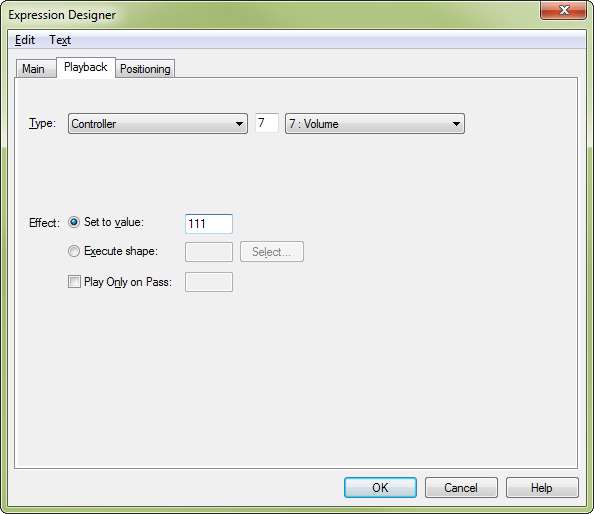
- You can add a (hidden, if desired) expression defined to modify MIDI controller #7 (volume). For instance, here is how you would configure the playback options for a staff expression that sets the staff’s volume to 111 (out of a possible 127):

This is like “fixing it in the mix” during a mixing session, by adjusting the instrument’s volume slider on the mixing board. Assigning an expression defined to modify MIDI controller #7 is a bit like creating an automated slider move on a modern, motorized mixing board — in other words, this kind of expression affects volume only, not timbre.
Tip: For expressions that modify MIDI volume to affect playback with Human Playback turned on, you must ensure that Human Playback is set to incorporate MIDI data.
Panning
Panning refers to an instrument’s relative position in the stereo mix. An instrument that is panned left will sound mostly (or, if it’s panned all the way left, entirely) from the left speaker, whereas an instrument that is panned dead center will sound equally from both speakers, and therefore sound like it is coming from the middle of the sound stage.
Choosing appropriate panning helps create a realistic stereo image and allows individual instruments to be clearly distinguished, even in large ensemble scores. When you create a score using the Setup Wizard, Finale tries to assign the best panning setup for the instruments you have chosen.
However, if you are preparing an existing file for Garritan playback, Finale uses the default panning (64, i.e., dead center) for all newly created instruments. In order to obtain the best stereo image for existing files, after you have configured them for Garritan instrument playback, you should choose MIDI/Audio > Reset Panning.
You can also customize the panning for individual instruments by clicking and dragging on the pan knobs at the top of each channel in the Mixer. Unlike the knobs in the ARIA Player (which are adjusted by dragging straight up or down), to adjust the panning dials in Finale, you drag the white dot on the knob into position using a circular motion. However, some find it difficult to make accurate panning adjustments using the Mixer’s interface. As an alternative, you can adjust the panning by typing numeric values in the Pan column of the Score Manager.
Unlike many digital audio applications, Finale doesn’t measure panning with a percentage value (like “33% left”, or “55% right”). Instead, it uses absolute MIDI values, from 0 (100% left) to 127 (100% right), with 64 being dead center.
The final thing to remember about panning is that any panning value you set in Finale overrides the pan setting in the ARIA Player (which, incidentally, uses left and right percentages instead of raw MIDI values). When they are first loaded, all Garritan instruments use their own default pan setting, corresponding to the traditional position of that instrument onstage.
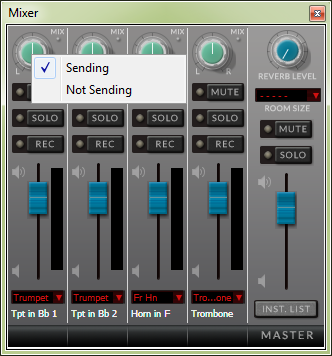
However, this ARIA Player setting is overwritten by Finale’s own pan setting as soon as you play back your score for the first time. If you don’t want this to happen, you can set the pan dials in the Mixer to “Not Sending” mode — this will preserve the Garritan instrument defaults. To do this, right-click each pan knob in the Mixer. This displays a contextual menu:

Selecting Not Sending prevents the mixer from overriding the pan setting used in the ARIA Player. There is no global Not Sending mode — you must right-click on each knob individually and select Not Sending mode one staff at a time. (It is also possible to right-click on the volume slider and choose “Not Sending” mode for volume as well, but this is not recommended.)
Studio View
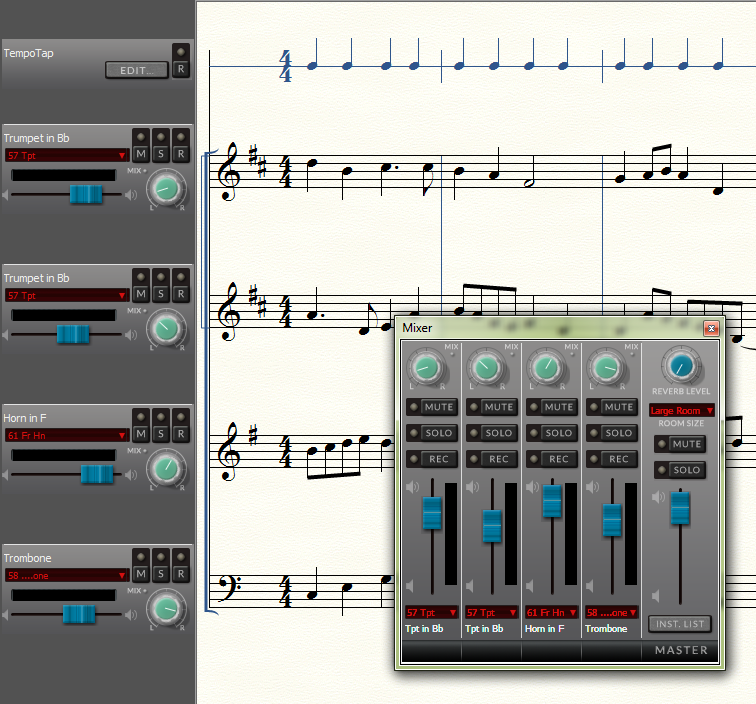
Studio View is very much like the Mixer, except that the controls are arranged horizontally instead of vertically, and there is no Master control. Also, there is an editable TempoTap staff at the top of the score, which allows you to record custom tempo changes.

As you can see above, anything you can do in the Mixer, you can also do in Studio View — with the exception of setting the Master volume or other Master settings. You may find Studio View convenient for playback because, unlike the Mixer, it doesn’t obscure the music notation during playback. You can make live adjustments to most of the controls in the Mixer and Studio View even during playback.
 Previous Previous
|
Next 
|

