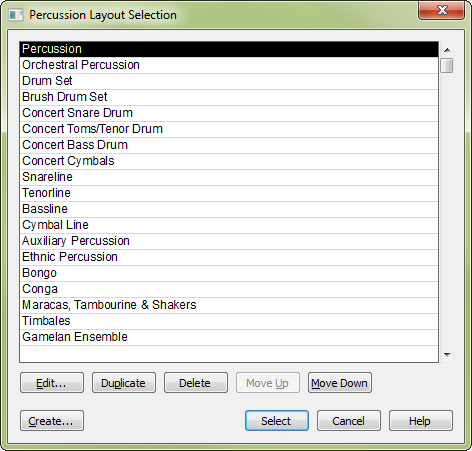
Percussion Layout Selection dialog box

How to get there
- Choose Window > ScoreManager and select a score instrument.
- From the Notation Style drop-down menu, choose Percussion if it’s not already selected.
What it does
The Percussion Layout Selection dialog box
displays the percussion layouts available in this document. Finale’s default
percussion layouts (which were saved in Finale’s percussion layouts library) appear
in this dialog box, as well as any percussion layouts you create or edit.
Use this dialog box to edit, create, and delete percussion layouts (that
can be used for any staff), and to select the current map that Finale
will use with the current staff.
Note: To load a percussion layouts
library, which can contain one or more predefined percussion layouts, choose the Load Library command from the File menu and select the
library you want to open. To save a percussion library, choose Save Library
from the File menu. Finale saves all the percussion layouts listed in the
Percussion Layouts Selection dialog box into one library.
- Edit.
Click a percussion layout in the list, then click Edit to display the Percussion Layout Designer dialog box, where you can
modify the note definitions and change which notes are used for the current
staff.
Note: Changes made
to a percussion layout apply to all staves that use that particular percussion
layout.
- Create.
Click Create to create a new layout. Finale displays the Percussion
Layout Designer dialog box, where you can set up the note definitions
and specify which notes are used for the current staff.
Note: Rather than
create new layouts, you may find it easier to edit the percussion layouts contained
in Finale’s default percussion library.
- Duplicate.
Click this button to create a duplicate copy of the selected percussion
layout. Use SHIFT-click to select an additional item and include all the
items in between. Use CTRL-click to select only a specific
additional item in the list.
- Delete.
Click this button to delete the currently selected percussion layout from
the list. If the map is selected for the current staff or any other staff
in the piece, you must choose an alternate percussion layout for those staves
before you can delete the percussion layout. Use SHIFT-click to select an
additional item and include all the items in between. Use CTRL-click to select only a specific
additional item in the list.
- Move
Up • Move Down. Click these buttons to move the selected item or
items up or down in the list. You can select more than one item. Use SHIFT-click
to select an additional item and include all the items in between. Use
CTRL-click
to select only a specific additional item in the list.
- Select.
Click the percussion layout that you want to use for this staff, then click
this button to dismiss the dialog box. Finale will
use the selected percussion layout for this staff until you select a different
layout, reset the staff to standard notation, or choose another option from
the Notation Style drop-down list in the ScoreManager.
- Cancel.
Click this button if you decide not to change the percussion layout used
by this staff. The percussion layout selected when you entered the dialog
box will be saved. All other changes that you made using the Edit, Create
or Delete buttons are also saved.
Note: Changes made
to a percussion layout apply to all staves that use that particular percussion
layout.
See also:
Percussion
ScoreManager
Staff tool


