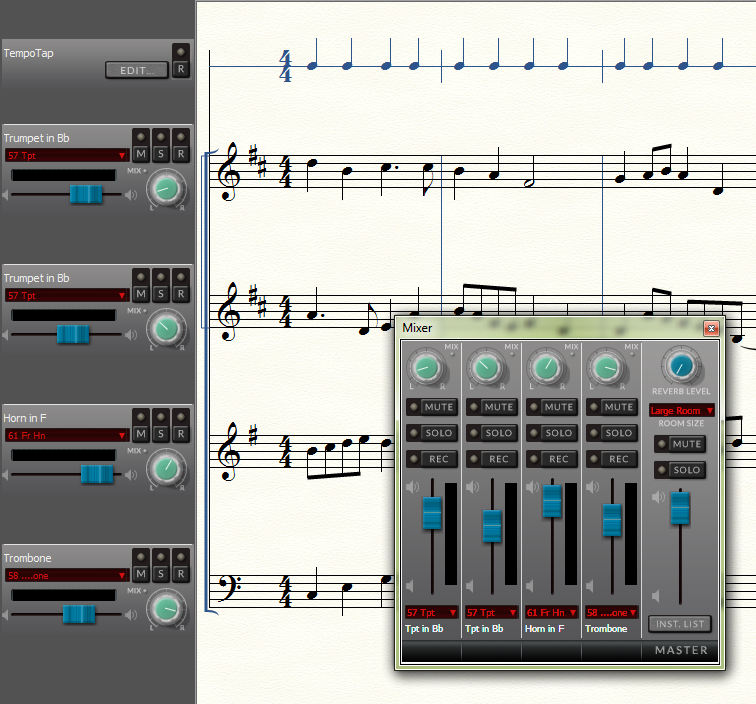
The Mixer
As you listen to your document, you may
discover a need to adjust the balance of individual staves. For example,
you may want to increase the volume of the flute section, or move the
trumpet section to the right side of the stage using panning controls.
You can use Finale’s Mixer controls to make these adjustments. The Mixer
allows you to make real-time playback adjustments to the full score, or
each staff individually. The mixer settings you apply are post-processed
on top of existing playback data, so all existing MIDI data, including
Human Playback, is left as-is (as if you were sending the music from your computer
through a conventional mixer). Mixer settings appear in the Mixer window
and Staff Controls. There is even a view, Studio View, designed specifically
for auditioning your score.
Note: Volume, panning, and instrument controls
in the ScoreManager, Mixer and Studio View Staff Controls are linked. A change to a
setting in one of these applies to all three.
- Choose View > Studio View. Your music is stretched across
the page as if you were in Scroll View. The Staff Controls appear to the
left of your staves. The Staff Controls are permanently affixed to the
left of your staves in Studio View (and only available in Studio View).
- Choose Window > Mixer. The Mixer window appears. All the
staff controls appear at first. In the following example the Mixer is
minimized. Move your cursor over the edge until
you see a double-sided arrow, then click and drag to resize the mixer.

The Master controls apply to the full score
and include a volume slider, reverb knob and room size drop-down menu. Staff Controls
include a volume slider, pan knob, and instrument selector, as well as
Solo, Mute, and Record buttons. All Staff Control settings are redundant
to the staff controls in the Mixer. All Mixer/Staff Control settings are
saved with the document, so your music will sound the same the next time
you open it.
Now, let’s take a quick tour of the Mixer controls
and explore some real-time playback effects:
- Click
the Play button in the Playback Controls. The following steps should
be performed during playback. It is a short piece, so if you reach the
end, just click the play button again and continue where you left off.
- Click
the Master Volume Slider in the Mixer and drag to adjust the volume.
Then, to make fine adjustments, use the UP and DOWN ARROW to move the
slider incrementally. You can also view these changes, or enter them manually,
in the ScoreManager.
- Click
the INST LIST button at the bottom of the Master control pane.
The ScoreManager appears. Click the Title Bar at the top and position
it so it is not obstructing the Mixer or Staff Controls.
- In
the Staff Controls on the left side of the screen, click and drag
a Pan knob counterclockwise as far as possible for one of the Piano staves.
When you release the mouse button, a small box displays the current value.
Notice the piano shifts to the left speaker or headphone.
You can also type a MIDI value (1-127) in any of these text boxes to specify
a precise value.
- To
the left of the String staff, Click the S button in the Staff Controls.
You are now listening to a string solo. Click “S” again to hear all the
staves. The M performs the opposite function of muting a staff. You
can mute or solo as many staves as you want.
- Finally,
click the Reverb knob and drag clockwise. The Reverb and Room Size
effects apply only to the overall output.


