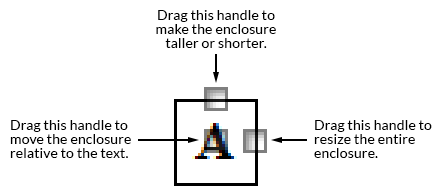
Enclosure Designer dialog box

How to get there
There are three ways to access the Enclosure Designer, depending on whether you want to edit an enclosure on an Expression, Repeat marking or Measure number:
- Click the Expression tool
 , and double-click a note or measure. In the selection
box that appears, click Create (or click an existing expression and click
Edit). If you like, enter or edit text in the Expression Designer
text box, then click Edit under Enclosure Shape.
- Click the Repeat
Tool
 . Click the tool, then click a measure. Click Create to create a new
text repeat (a piece of text that functions as a fully operational repeat
marking, such as "To Coda"), enter the text for the text repeat,
and click Enclose Repeat.
- Click the Measure tool
 and select Measure > Measure Numbers > Edit Region. Click Enclosures. Or, double-click the
of certain measure numbers in the score to change their enclosures. Specifically,
it appears if you’ve specified Enclosures in the Measure Number dialog
box for the current region of measures. See Measure
Number dialog box for details.
What it does
This dialog box lets you enclose the expression
mark (such as a rehearsal letter) or text repeat (such as "To Coda")
in a box of any size, geometric shape, or line thickness. If you encounter
it using the Measure tool, it lets you modify, add, or remove the enclosure
for the measure number you clicked.
- Shape:
Rectangle, Oval, … None. Use this drop-down list to select a shape such as
a rectangle, oval or triangle, to draw around the text, or choose None
if you don’t want an enclosure to appear.

- Line
Thickness. Type the thickness, in measurement units, of the enclosure
shape’s outline.
- Opaque.
Select this option to make the prevent items behind the enclosure from
showing through. This is only available for rectangles and ellipses.
- Height.
Type the distance to add to Finale’s default height of the enclosure,
in the selected measurement units (Edit menu).
- Width.
Type the distance to add to Finale’s default width of the enclosure in
the selected measurement units (Edit menu).
- Center:
H: • V:. Type the amount to shift the enclosure horizontally and
vertically, if you don’t want it centered on the text. Positive H: numbers
move the enclosure shape to the right of the center of the text. Positive
V: numbers move the enclosure shape upward from the text’s baseline.
- Options:
None, Enforce Minimum Width, Match Height and Width. Use this drop-down
list to control how the shape is drawn. If you choose None, Finale allows
you to independently set the height and width of the shape. Choose Match
Height and Width to display the shape symmetrically so that the enclosure's
height matches its width. Choose Enforce Minimum Width to enforce a minimum
width so the enclosure’s height doesn’t change when its width adjusts
to the text.
- Fixed
Enclosure Size. When this option is selected, Finale maintains
the exact size of the enclosure despite the size of the text. When this
option is not selected, Finale adjusts the width (and size) of the enclosure
depending on which item is selected in the Options drop-down list.
- Use
Default Enclosure. This option is only available when you have
accessed the Enclosure Designer through a measure handle. If you have
specified a unique enclosure, use this button to reset the item to use
the default enclosure used in the rest of the document.
- OK
• Cancel. Click OK to return to the previous dialog box. Click
Cancel to return to the previous dialog box (or to the score) without
making any changes.
Tip: Choose Match
Height and Width from the Options drop-down list for Rehearsal letters if you
want the shape to be the same size throughout the score.
See also:
Expressions
Expression
Tool


